Staying inside during lockdown can be monotonous and lethargic. However, pursuing your favorite hobby can add some colors to your dull lifestyle. While some prefer gardening, cooking, even reading, I above all just can’t think of anything else than playing my favorite online multiplayer games. And in recent times when the audience for such games has increased worldwide, your gaming experience is hindered as keeping tabs on graphics and network is a pre-requisite to keep the gameplay constant by your side. Moreover, when a Windows laptop or desktop system acts lazy and a notification pops up then and there between the games that’s a different kind of a buzzkill. Well, worry not gamers, this article is about solving your problem and improve gaming performance on your Windows PC.
Ways to Improve Gaming Performance on Windows 10 & Older Versions
From updating graphics drivers to managing basic PC functions, here are some tricks and tips to boost performance in your Windows PC that are piece of cake and worth trying.
1. Update Your PC Drivers
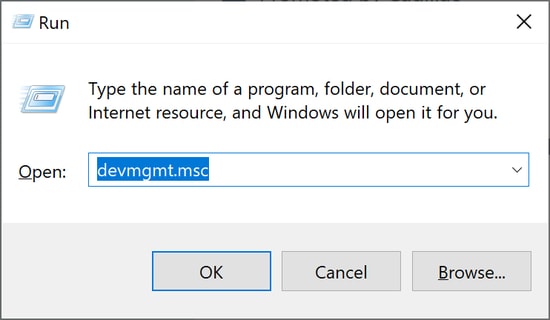
The best way to boost the performance of the game and enjoy an optimized gaming experience is to update graphics drivers. There are two ways you can use to do so: manual and automatic. Manual Way: To update your graphics card driver manually, you can take the help of the Windows built-in Device Manager tool. But, keep in mind that the procedure is quite lengthy and error-prone, so you need to remain patient and have strong computer skills. Here are the required steps. Step 1: Launch the Run command box by pressing the Windows and R key simultaneously. Step 2: In the box, type devmgmt.msc and click on OK.
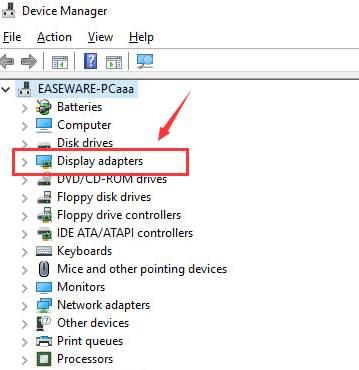
Step 3: In Device Manager, locate the Display adapters category and expand the same.
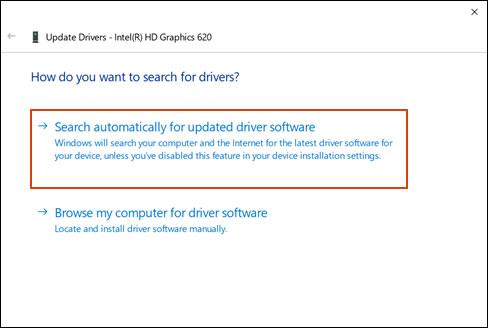
Step 4: Then, right-click on your graphics card and choose the Update Driver option from the menu. Step 5: On the next window, choose the Search automatically for updated driver software option.
Now, Windows will find and install the latest driver update for your graphics card. Once the update gets installed, you need to restart your computer to let the changes take effect. Also Read: List of 23 Best Cloud Gaming Services Available in 2021 Automatic Way (Experts-Recommended): If you want to install the latest graphics driver updates more quickly and efficiently without putting any manual effort, then you can use an automatic third-party software (such as Bit Driver Updater). This program automatically recognizes your hardware components and helps install the most recent, compatible drivers with one click of a button. Below are the steps to use it. Step 1: Download & install Bit Driver Updater.
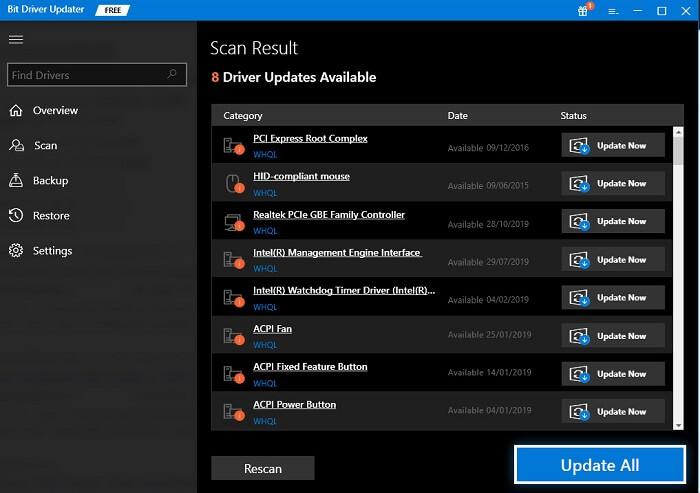
Step 2: On the homepage, click the Scan Drivers button to detect all the outdated, missing, and defective drivers. Step 3: Once you get the scan results, click the Update Now button next to the driver you want to install an update for.
2. Turn off Mouse Acceleration
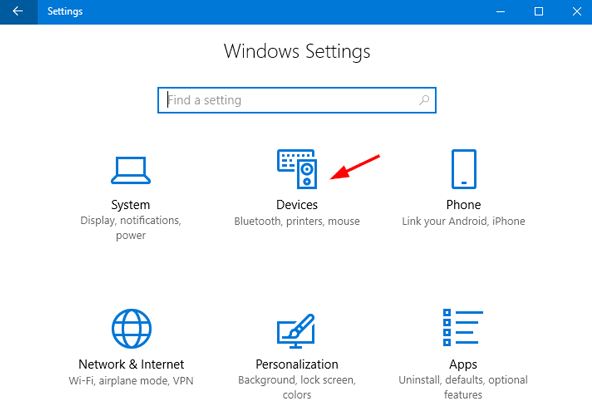
Another hack to ameliorate your gaming experience is by Disabling Mouse Acceleration in your Windows PC. The hack will definitely optimize gaming performance on your computer. Following are the steps that you shouldn’t skip if you aim for a faster and smoother gaming experience on your Windows 10 computer: Step 1: Press Windows and I key together to launch the Windows Settings app. Step 2: Now, select Devices sub-setting and then choose the Mouse tab.
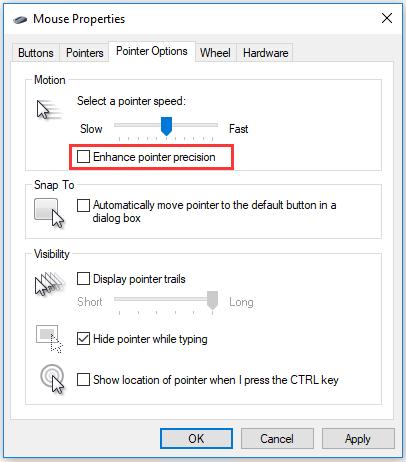
Step 3: Then, find the Additional mouse options by scrolling downward and click on it.
Step 4: Navigate yourself to the Pointer Options tab and uncheck the Enhance pointer precision option available under the Motion section.
Once all the steps are complete then nothing can stop you from having the time of your life. The gaming activities on your PC will now be better than ever. Also Read: Logitech Gaming Software For Windows | Download Latest Version
3. Manage Automatic Windows Updates
As a matter of fact, we all know that Windows automatically updates the operating system to patch security flaws and provide additional functionality. However, the situation gets tacky when Windows starts updating your system without any notification during your gameplay, which in turn reduces your internet connectivity. In order to manage automatic updates for Windows 10 devices, follow the given steps below: Step 1: Open the Windows Settings app and select the Update and Security sub-setting. Step 2: Under the Windows Update section, look out for Advanced options and click on it.
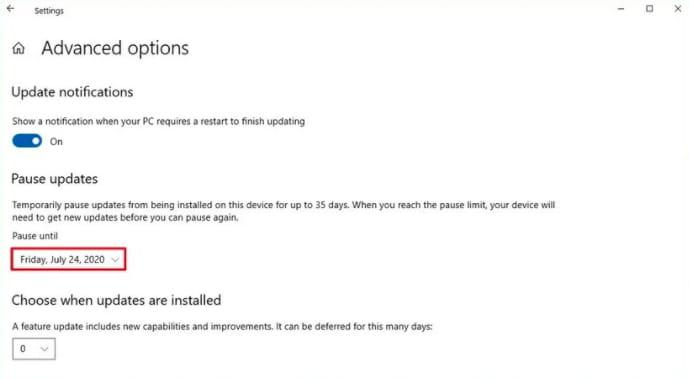
Step 3: In the next step, scroll down to the Pause updates section and use the drop-down menu to delay the installation of updates for the upcoming 35 days.
4. Change DNS Server for Faster Gaming Experience
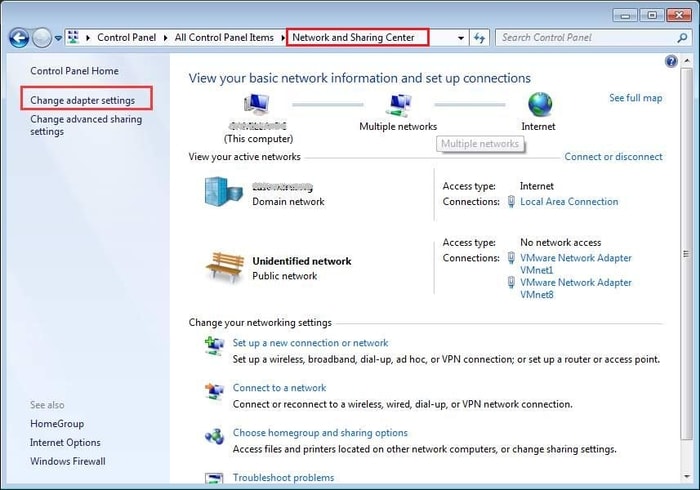
If by any chance you need a remote server to play your game then your gaming experience can be affected severely due to network traffic. In order to get faster internet speed, you can tweak some networking issues by changing the DNS server settings. Here is what you need to do: Step 1: Go to the Network and Sharing Center and then choose the Change Adapter Settings option from the left pane.
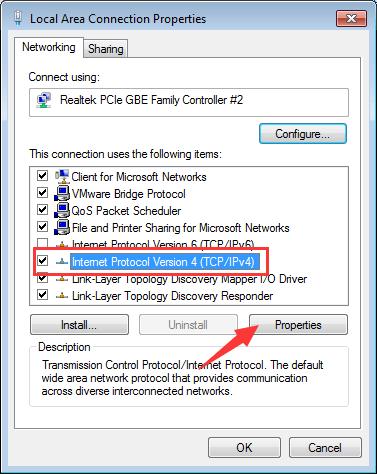
Step 2: After that, right-click on your wireless network and choose the Properties option from the pop-up menu. Step 3: Then, tick the checkbox next to Internet Protocol Version 4, and select Properties.
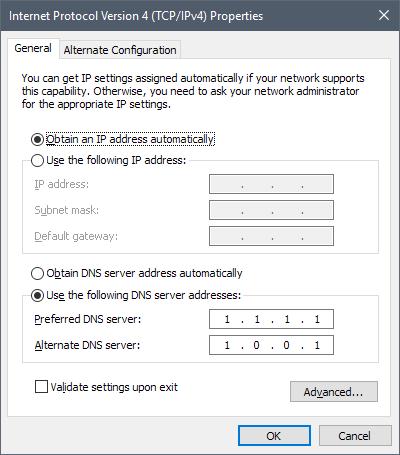
Step 4: Now, replace the DNS entries with 1.1.1.1 (Preferred DNS server) and 1.0.0.1 (Alternate DNS server).
Step 5: Click OK to save the changes. Restart your computer to complete the process and Voila! Your internet connection is as good as new. Ensuring a good internet connection should be your first priority when you are into online multiplayer gaming. Also Read: How to Set Up Gaming Steering Wheel on PC – Quickly and Easily!
5. Disable Notifications on Your Windows 10 PC
Take command of managing how and when to receive notifications by taking the help of the Focus Assist Feature in Windows 10. With the feature, you can manipulate the settings to receive notifications only when you want them. Now prevent notifications from interrupting your gala time. To disable notifications on your PC, follow the step-by-step instructions shared below: Step 1: Open Settings app (Windows + I key). Step 2: Now, open the System sub-setting and select the Focus assist option from the left-hand side pane. Step 3: Next, you can either select Priority only (receive notifications only from your priority list) or Alarms only option (hide all notifications except alarms).
Also Read: Top 15 Best Free Movie Download Sites | Watch The Latest Trending Movies
Final Thoughts: Improve Gaming Performance on Windows PCs
Apart from the above-mentioned tips and tricks, you can always adjust your background visual effects settings for better performance of the PC. Additionally, turning off auto-updates on Steam can proliferate the overall gaming experience. Hope that the following tips served the purpose and made your life a bed of roses. If you have any ideas or suggestions regarding this matter, let us know about them via the comments section below.