What is FileVault?
FileVault can be best described as an in-built disk encryption feature available on your Mac. FileVault full-disk encryption (FileVault 2) uses XTS-AES-128 encryption with a 256 bit key to protect all your files and data on Mac. Once you enable FileVault feature on Mac, it starts encrypting the current files and folders on your Mac. This can take anywhere from 15 minutes to 3 hours depending on the amount of data on your Mac and the speed of your Mac. However, once the disk is encrypted, FileVault offers on the Fly Encryption for every new file that you create or modify on your Mac. While encryption of new files on Mac does not really take any time, there is a minor performance hit involved while using the FileVault feature on your Mac. The difference in performance is hardly noticeable on newer Macs with SSD drives and can be noticed on older Macs without SSD drives.
Advantages of FileVault Encryption on Mac
As mentioned above, FileVault Encrypts all the Files and data on your Mac, which makes it practically impossible for anyone to gain unauthorized access to Files and Data on your Mac. This ensures that your data and personal information is protected, even if you happen to misplace or lose your Mac or it gets stolen.
Disadvantages of FileVault Encryption on Mac
Although FileVault is so easy to use, it is not suitable for everyone. It is not recommended for those who do not need such high level of security and especially not recommended for those who are likely to forget or lose passwords. FileVault Encryption is so powerful that there is really no way to recover your data in case you happen to lose your password and the backup recovery key. Also, FileVault uses on-the-fly encryption which can lead to a noticeable decrease in performance on older Macs.
How to Enable FileVault Encryption on Mac
Follow the steps below to Enable FileVault Encryption on Mac.
Click on the Apple Icon located in the top menu bar on your Mac and then click on System Preferences… option in the drop-down menu that appears.
On the System Preferences screen, click on Security & Privacy option.
On the Security & Privacy screen, click on the little Lock icon located in the lower left corner of the screen (See image below)
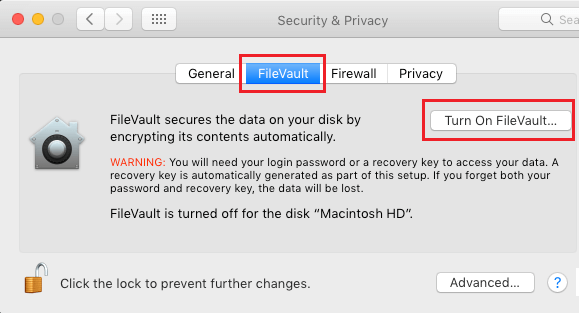
4. When prompted, Enter your Admin User Name and Password. 5. While you are still on Security & Privacy screen, click on the FileVault tab and then click on Turn ON FileVault button (See image below).
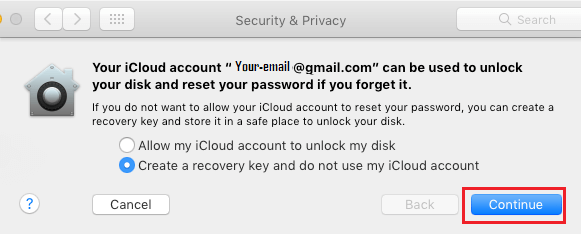
- On the Next screen, you can either choose your iCloud Account to unlock FileVault Encrypted Disk or choose the option to Create a Recovery Key option in order to unlock the Encrypted Disk (See image below).
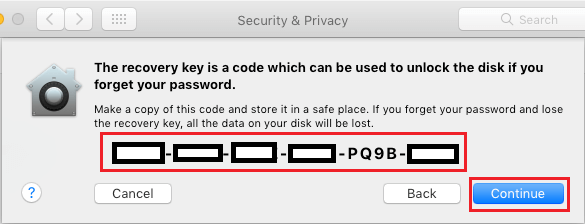
Choose any option that suits you and click on the Continue button (See image above) 7. In case you had opted to Create a Recovery Key, make sure that you note down the recovery key that appears on the next screen and keep it in a secure place.
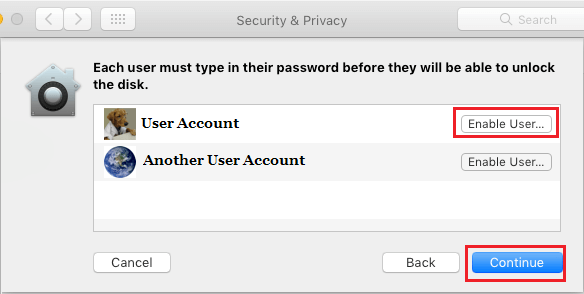
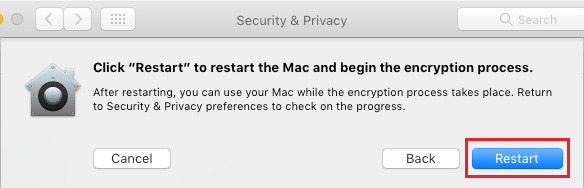
The FileVault Recovery key as generated by your Mac is a 24 character alphanumeric password alternative that can be used to Decrypt the drive in case you happen to forget your password. In case you have multiple User Accounts on Mac, you will need to Enable FileVault access individually for each User Account by clicking on Enable User button next to the User Account (See image below). Once you have Enabled Users, click on the Continue button. 8. Finally, click on the Restart button to begin the process of Encrypting Files on your Mac.
The time to Encrypt Files will depend on the amount of Data on your Mac and also on the speed of the Disk. The process will be faster in case you have an SSD Drive on your Mac.
How to Disable FileVault Encryption on Mac
In case you decide that you do not really need FileVault Encryption or notice slowdown in the performance of your Mac, you can disable FileVault on Mac at anytime by following the steps below.
Click on the Apple Icon located in the top menu bar on your Mac and then click on System Preferences… option in the drop-down menu that appears.
On the System Preferences screen, click on Security & Privacy option.
On the Security & Privacy screen, click on the little Lock icon located in the lower left corner of the screen (See image below)
On the popup, Enter your Admin User Name and Password. 5. While you are still on System & Privacy screen, click on the FileVault tab and then click on Turn OFF FileVault button. 6. Next, confirm that you wish to Disable FileVault and then restart the Mac by clicking on Restart & Turn Off Encryption Your Mac will automatically reboot and begin the decryption process. Decrypting the drive can take its own time, depending on the amount of Data on your Mac and speed of disk drive. SSD drives will be faster compared to regular HDD drives.
How to Setup Time Machine Backups On Mac
![]()

![]()
![]()
![]()
