Lock Notes on Mac with Password
The native Apple Notes App on Mac can be used to save all kinds of information, ranging from Shopping Lists, Book List, List of Useful Websites to Bill Payment Amounts and their cut-off dates. You can even Attach Photos, Videos, Maps and Documents to your Notes on Mac and prevent this information from being accessed by other by Locking Notes with Password. What’s even better is that you can access your Notes on any iOS device (iPhone, iPad or iPod) and the password protection will still remain in place.
1. Password Protect Note on Mac
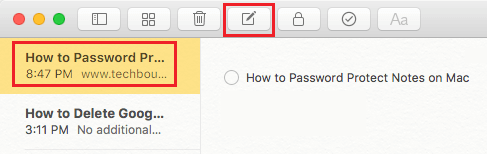
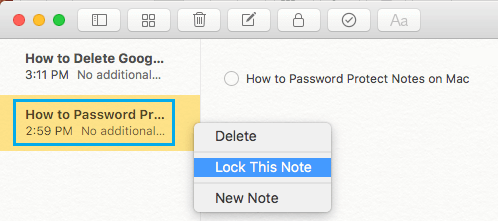
Open the Notes App on your Mac > open the Note that you want to Password Protect. If you want to create a New Password Protected Note, click on the New File icon in the top-menu bar.
Once you are in the Note, click on the Lock icon in the top toolbar and select Lock This Note option in the drop-down menu.
On the next screen, Type Password, Verify Password, Type Password Hint and click on Set Password button. Note: The Password for the Notes App can be the same as your Lock Screen Password.
Once the Password is set, you will be greeted with “This Note is Locked” message, whenever you try to open any Password Protected Note on your Mac.
2. Unlock or Open Password Protected Note on iPhone
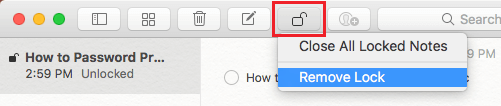
The only way to access Locked or Password protected Notes on Mac is to enter the Password that was used to protect the Note. Open Notes App > select the Password Protected Note that you want to open > click on the Lock icon and select Remove Lock option in the drop-down menu.
On the pop-up, enter the Password that was used to Lock this Note on your MacBook.
3. Change Notes Password on Mac
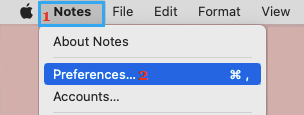
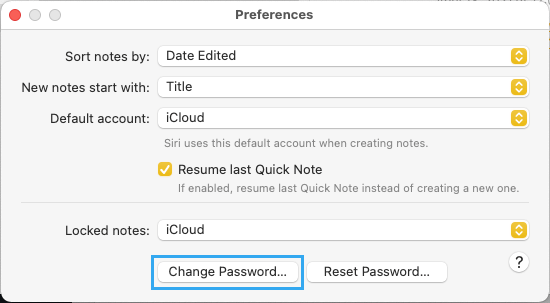
Open Notes App > click on Notes tab in top-menu bar and select Preferences in the drop-down menu.
On the Preferences screen, click on Change Password option.
On the next screen, enter old password, new password, verify new password and click on change password button.
4. Reset or Remove Notes Password on Mac
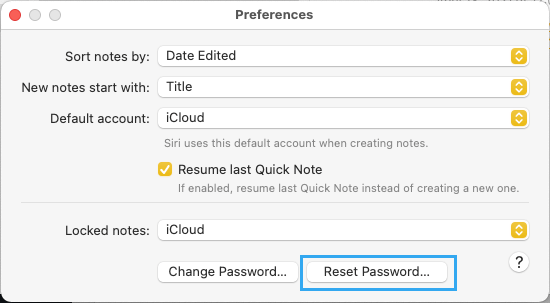
Open Notes App > click on Notes tab in top-menu bar and select Preferences in the drop-down menu.
On the Preferences screen, click on Reset Password option.
On the Confirmation Password, select the Reset Password option to Confirm.
What You Need to Know About Protected Notes
Now that you know the steps to Lock or Password Protect Notes on Mac, you also need to be aware of the following information about Protected Notes on Mac.
Even if a Note is Password Protected, the first line in the Note will be visible as the Title of the Note. Hence, it is important to make sure that the first line of a protected Notes is not giving away any personal information.
When you try to open Notes on Mac, only the Protected Notes will be prompting for a Password. You will be able to access all unprotected Notes on your device, without entering any password.
Only a single password can be used to protect all your Notes on Mac. There is no provision in the Notes App to create different passwords for different Notes.
Once a Password is created for the Notes App, you will be able to Lock any existing unprotected Note on your Mac by right clicking on the Note and selecting Lock This Note option in the side-menu.
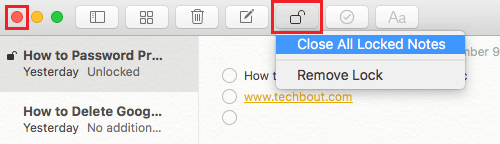
When you are finished reading or editing a Password Protected Note, make sure that you either Quit the Notes App by clicking on the Red Close Button in the top-menu bar or click on the Lock icon and select Close All Locked Notes option.
This will ensure that all you Password Protected Notes remain Locked on your device.
How to Password Protect Notes On iPhone How to Password Protect Folders on Mac