Start, Stop, Restart Print Spooler in Windows 10/11
When you issue print commands from the computer, the sequencing and queing the print jobs is handled by the Print Spooler Service, as available in Windows 10/11. The Print Spooler Service is basically a software program in Windows operating system, specifically designed to manage printers and print jobs issued from the computer. Sometimes, the Print Spooler service stops working, in which case you will have to manually Start or Restart the Print Spooler Service on your computer. Depending on your preferenace, you can Start, Stop and Restart Print Spooler Service using the Task Manager, Command Prompt, and Services.
1. Start, Stop, Restart Print Spooler Using Task Manager
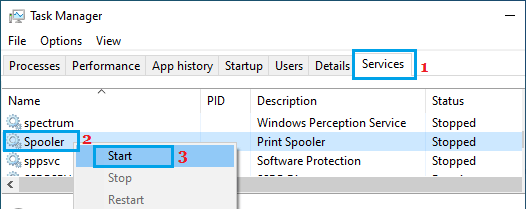
Perhaps the easiest way to Start, Stop or Restart the Print Spooler Service in Windows 10/11 is by using Task Manager. Right-click the Start button and select Task Manager. On Task Manager screen, switch to Services tab, right-click on Spooler entry and click on Start.
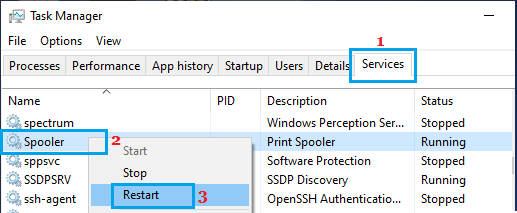
Similarly, you can Restart Print Spooler by right-clicking on the Spooler entry and selecting the Restart option.
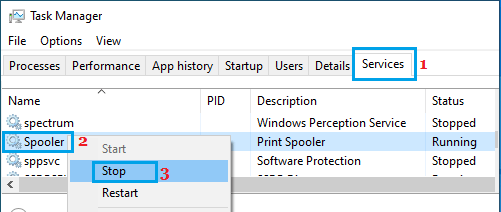
Note: The Restart option may not be available if the Spooler is not working. At any time, you can Stop the Print Spooler Service by right-clicking on the Spooler entry and selecting the Stop option.
2. Start, Stop, Restart Print Spooler Service Using Services
Right-click on the Start button and click on Run. In the Run command window, type services.msc and click on OK.
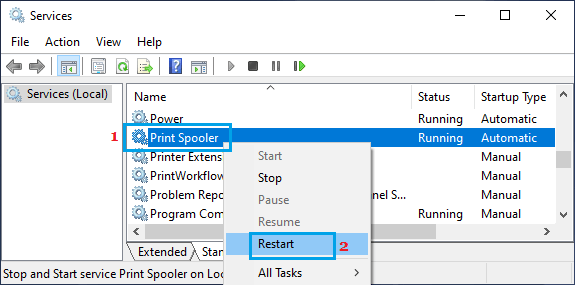
On the Services screen, right-click on Print Spooler and click on the Restart option.
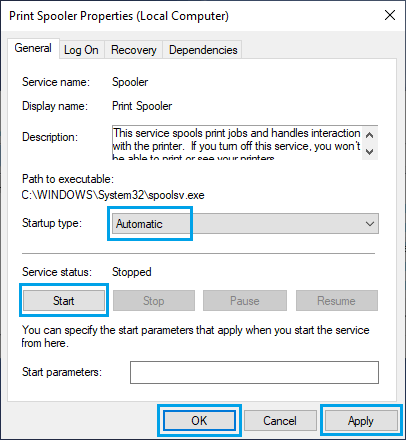
Also, make sure that Print Spooler service is set to Start Automatically. If it is not, double-click on the Print Spooler entry. On the next screen, change the startup type to Automatic.
Click on Apply and OK to save this change to the Print Spooler service on your computer. After this, restart the computer and you should be able to Print.
3. Stop, Start, Restart Print Spooler Using Command Prompt
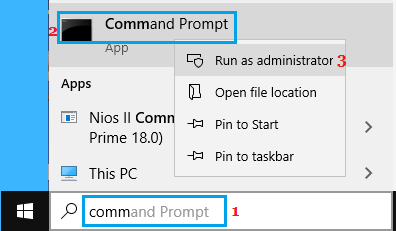
Type CMD in the Search bar > right-click on Command Prompt in the search results and select Run as Administrator option.
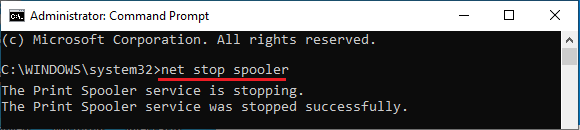
In Command Prompt window, type input net stop spooler and press the Enter key to Stop Printer Spooler on your computer.
If the problem is being caused by a corrupted Print Queue, open the File Explorer and navigate to C:\Windows\System32\Spool\Printers and delete all contents in the Printers folder. Go back to Command Prompt, type net start spooler and press the Enter key to start print spooler.
After this, you should be able to Print from the computer, without encountering any error codes.
How to Open Devices and Printers in Windows 11/10 How to Add Wireless or Network Printer in Windows 10